
How to Use Bucket Mode to Customize Consent Categories and GPC Behavior
By default, the cookie settings panel of a consent banner shows one toggle for each consent category. Bucket mode replaces those with toggles that you define, called buckets. Each bucket has its own label, the categories it controls, a default state, and a setting that decides whether it responds to opt-out signals such as Global Privacy Control (GPC).
When to use bucket mode
You want plain-language labels, such as “Analytics” or “Advertising”, in place of the standard category names.
You want fewer toggles, for example one toggle that covers both Functionality and Performance.
You want to choose which toggles are turned off when a browser sends a GPC signal or a visitor makes a Do Not Sell or Share request. Visitors make that request with the Do Not Sell or Share My Personal Information toggle, on banners that show it in the cookie settings panel.
Behavior without bucket mode
Without bucket mode, the panel shows the standard toggles, which the editor labels Cookie Toggles (Legacy mode): Strictly Necessary, which is always on, plus Functionality, Performance, and Targeting. When a visitor’s browser sends a GPC signal, all non-essential categories are rejected.
Turn on bucket mode
Open the configuration in the consent banner editor. See How to Customize Your Consent Banner in the Banner Editor.
Select the Cookie settings scene.
Under Categories, open Bucket Configuration and select Enable Bucket Mode.
For each bucket, set the options described in the table below.
Select Add Bucket to create another bucket. Drag a bucket to change its position, or select the trash icon to delete it.
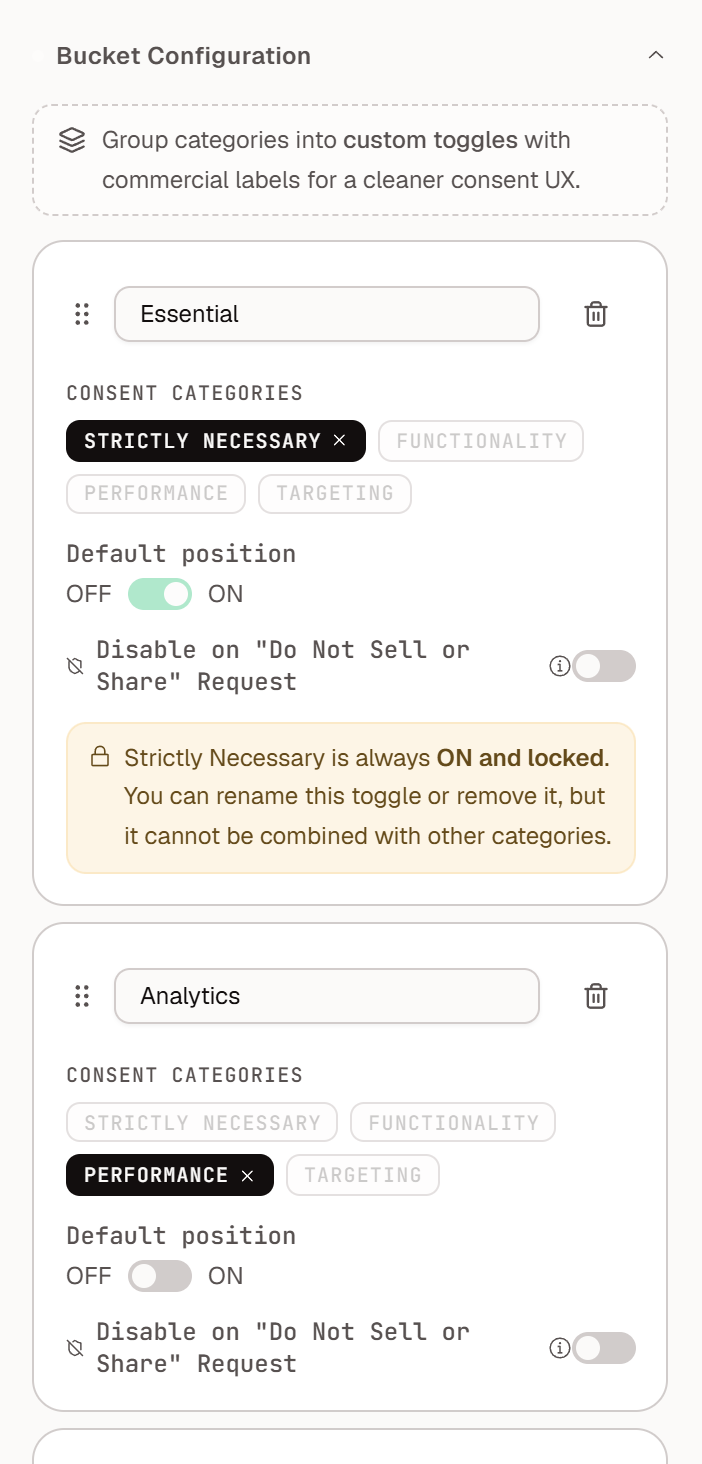
Select Save Configuration.
Select Save, and then select Publish, to make the change live.
Option | What it does |
|---|---|
Toggle label | The name visitors see for the toggle. |
Consent categories | The categories the toggle controls. A bucket can hold one category or several. |
Default position | Whether the toggle starts ON or OFF before the visitor chooses. |
Disable on “Do Not Sell or Share” Request | When this is on, the bucket is turned off automatically when a visitor submits a Do Not Sell or Share My Personal Information request, or when a GPC signal is detected. |
Rules to keep in mind
Put every category in a bucket. The editor warns you about categories without a bucket, because they will not appear in the consent banner.
Strictly Necessary is always on and locked. You can rename or remove its toggle, but you cannot combine it with other categories.
Default position sets the consent model for the configuration: OFF for opt-in, ON for opt-out. See How to Create Regional Consent Banner Configurations.
Bucket labels are translated along with the rest of the banner text in Languages mode.
Example
A configuration for an opt-out region might use these buckets:
Toggle label | Consent categories | Default position | Disable on “Do Not Sell or Share” Request |
|---|---|---|---|
Essential | Strictly Necessary | ON (locked) | Off |
Site experience and analytics | Functionality, Performance | ON | Off |
Advertising | Targeting | ON | On |
With this setup, a visitor whose browser sends a GPC signal has Advertising turned off automatically, while Site experience and analytics keeps its default. A visitor without GPC starts with every toggle on and can turn any of them off.
Which categories must respond to GPC depends on the laws that apply to your organization. Make this decision with your legal team.
Update the GPC notice
The GPC signal scene in the editor controls the notice that visitors see when GPC is detected. Edit its description so that it matches what your buckets turn off.
Test the result
Load your site in a private browser window and open the cookie settings. Confirm that the labels and defaults are the ones you set.
Turn on GPC, clear the site’s cookies, and reload. Confirm that the buckets set to respond are off and that the others keep their defaults.
Confirm that your tags and scripts follow the toggles.
To send a GPC signal from Chrome, see How to Use the Captain Compliance GPC Extension. For the full test plan, see How to Test Consent Banner Configuration & Behavior.